This is the translation of the original “Making Of” done in Italian for Character’s Forum.
You can find the original making of here.
Introduction
The pipeline that I used was a bit experimental and sometimes the combination of software that I chose ended up being far from perfect: as I will illustrate the various steps I will indicate when I was fine and when I ran into problems.
Skore John is a space mercenary created through the steps indicated by the Contest Rules of “Sham Universe”: Concept, Modeling, Texturing and Composition
Theoretically, the phases are distinct … in theory? …
In fact during the creation of the mercenary I often found myself in “hybrid” stages where I was a step backward or a step forward.
Here are direct links to various topics of this Making Of:
– The Concept
– Modeling part 1
– Modeling part 2
– Modeling part 3
– Modeling part 4
– UV mapping
– Texturing
– Final Compositing
The Concept
The concept is the part that requires more creativity and is very delicate because it is the part that lays the foundation for everything that follows.
The theme of the contest gave a very wide choice of a theme already seen and used many times (film, comics, video games … and the theme was also echoed by other international contest of CG).
On the one hand this means that there was (and there is) a flood of material from which get inspiration… but to the other side propose something “new” and “original” became a challenge.
My choice was the use of a fun comic style for several reasons:
– The fun comic style contrasts with most of the material that is located on the theme of the contest
– The fun comic style can exaggerate the stereotypes of the genre without becoming a defect (in fact this is even better. ..)
– With a fun comic style would be easier to keep my personal trait
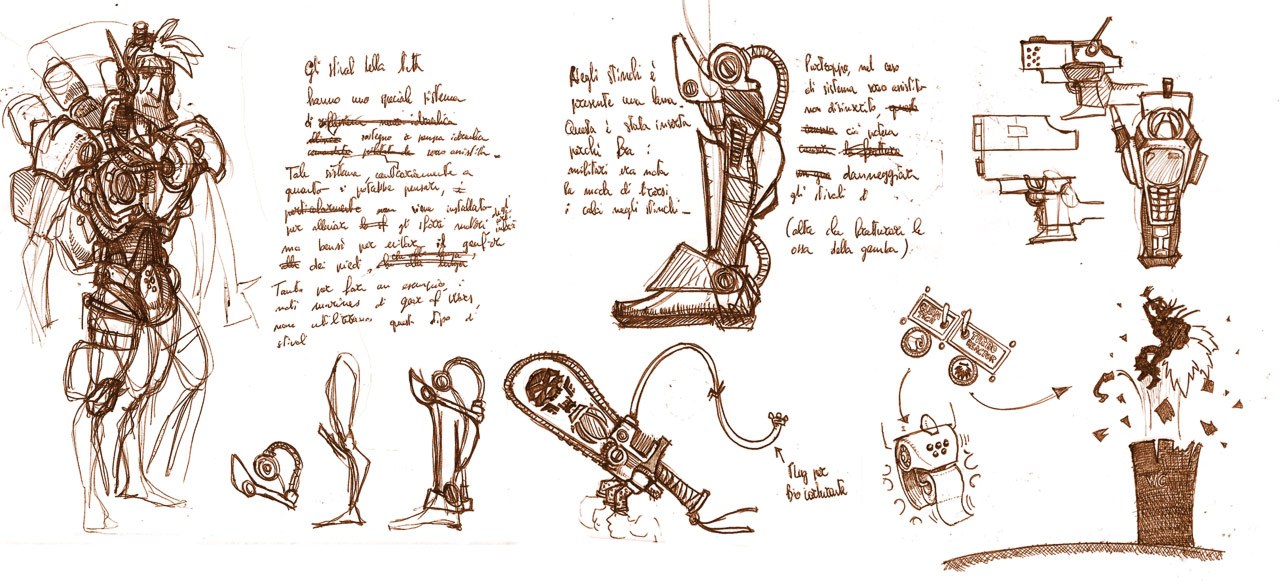
The idea was to make a little man with a tough face but undersized and crushed by the mole of armour and weapons and armor… this make his look more funny than heroic.
Although I have always noticed in retrospect, I was heavily inspired by “Nathan Never” and “Metal Slug” … as well as from the ideas of other participants of the contest :)
Once taked the initial choice I started doing different sketches to try to better focus the character and characteristics.
So far, the means used were paper, pencil and imagination.
Sometimes I could think to something stupid like the button of the engine next to the toilet paper and then was fun to illustrate the idea with a sketch.
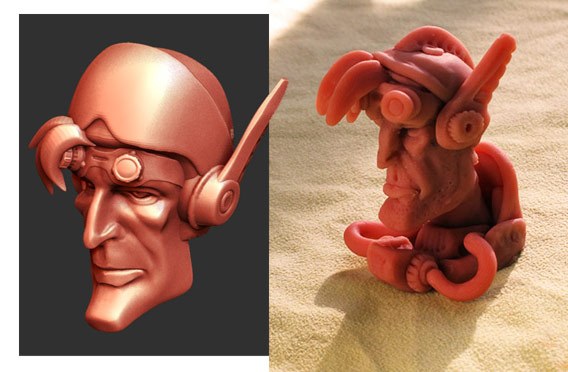
Once terminated the sketches I began modeling, with a little doodle in ZBrush, with a little doodle with some Super Sculpey, to try to better focus the character.
Although the concept phase was not finished I went to the early stages of modeling, where I continued to focus more and more the character.
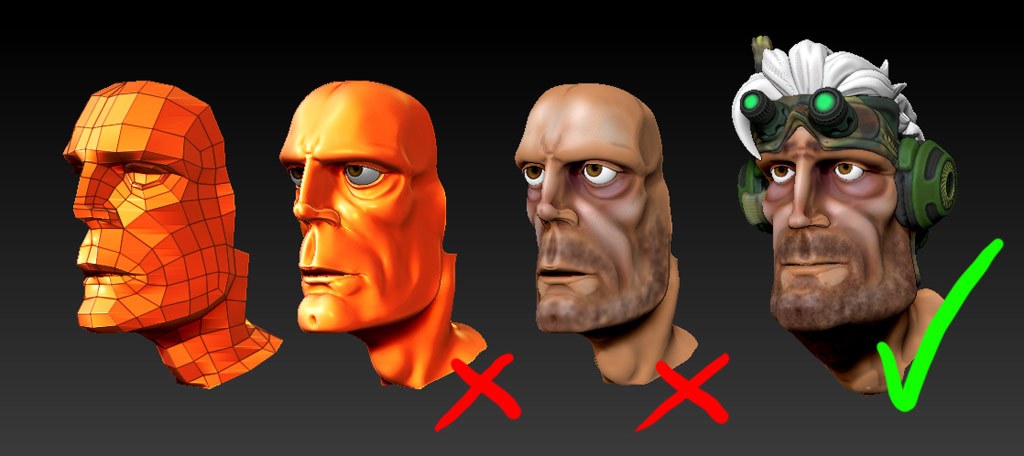
For example, for the face I could not get what I wanted. Even after the Retopology phase, sculpting and paint I found myself faced with a kind of Doctor House that just does not convinced me … Then I finally got those magic 5 minutes that happen every now and then and after a bit of doing with the “Move” the true face of John finnally went out!
Even the polypaint of the face was suddenly knocked down within about a quarter of an hour, but the result was so exciting for me that I have not touched it except to add some detail.
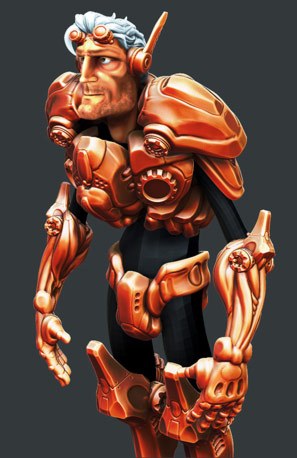
Some intermediate still with the character that is not yet complete often help to focus it better and, if the result is good, they also give a sprint when the morale is low.
At the end in this concept of original there is very little because all the elements are more or less already seen and reviewed, however, I am satisfied with the good mix of elements and the character’s personality.
Modeling Part 1
With modeling we give life to the concept…
When all goes well, the personality begins to emerge the character and drags you to carry on the work because you are curious to see what can you bring out.
In the early stages I was a little demoralized … I was not pleased with the initial results and I felt I was not making great progress.
Going forward, however, John finally took its character out and the curiosity to see it completed was a great stimulus to be able to complete it.
But we have to go in order:
From concept I had already done a little idea of how to organize the work:
The model was composed of three main blocks: John, the backpack and the big weapon.
To these I then added a number of secondary elements such small weapons, pipes, belts, etc …
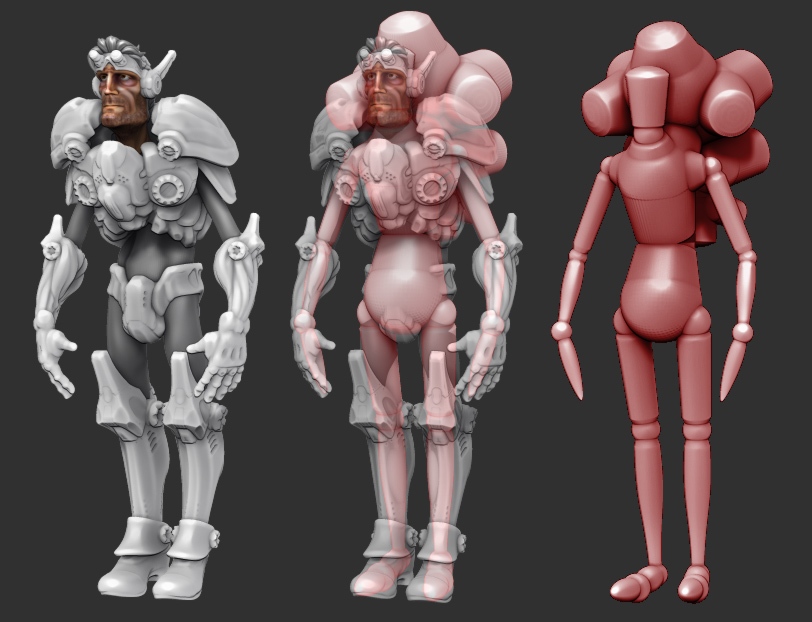
The first step was to define the volume of all the elements involved.
So I started doodling down the first block: a spare to use as a base to add various elements of the armor.
At this stage it was not important for me to follow a particular structure or pay attention to the number of polygons, but was fundamental get the right proportions and some harmony between these.
The sketches I had done gave a rough idea, but were far from representing defined volumes: the first phase of modeling, therefore, was to all intents and purposes a good portion of concept.
The first step was to define more or less the volume of all the elements involved.
In this first phase the immediacy of ZBrush was extremely useful.
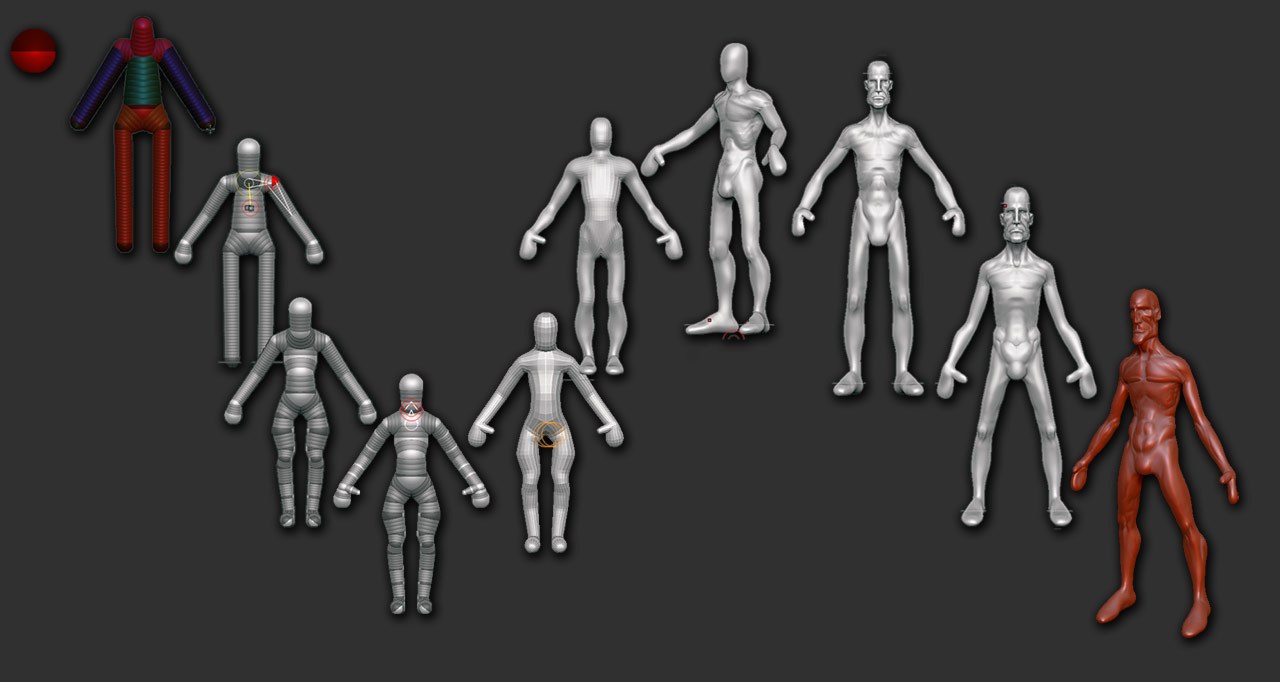
Using the zSphere I created in no time the structure of the man and I’ve converted it in polymaesh as soon as possible to begin to make some proportion with the sculpting tools and the freedom to move between the various levels of subdivision.
Note: with the present version of zBrush the Dynamesh is a great tool… but this work was done with the 3.5
Going a little down in detail:
– To change the larger volumes I used almost exclusively on the Move, the Inflat, and Transpose Applied to the lowest levels of subdivision.
– To outline the first details on coarse Clay, ClayTube, the Standard and Smooth by increasing the level of subdivision to detail a little finer.
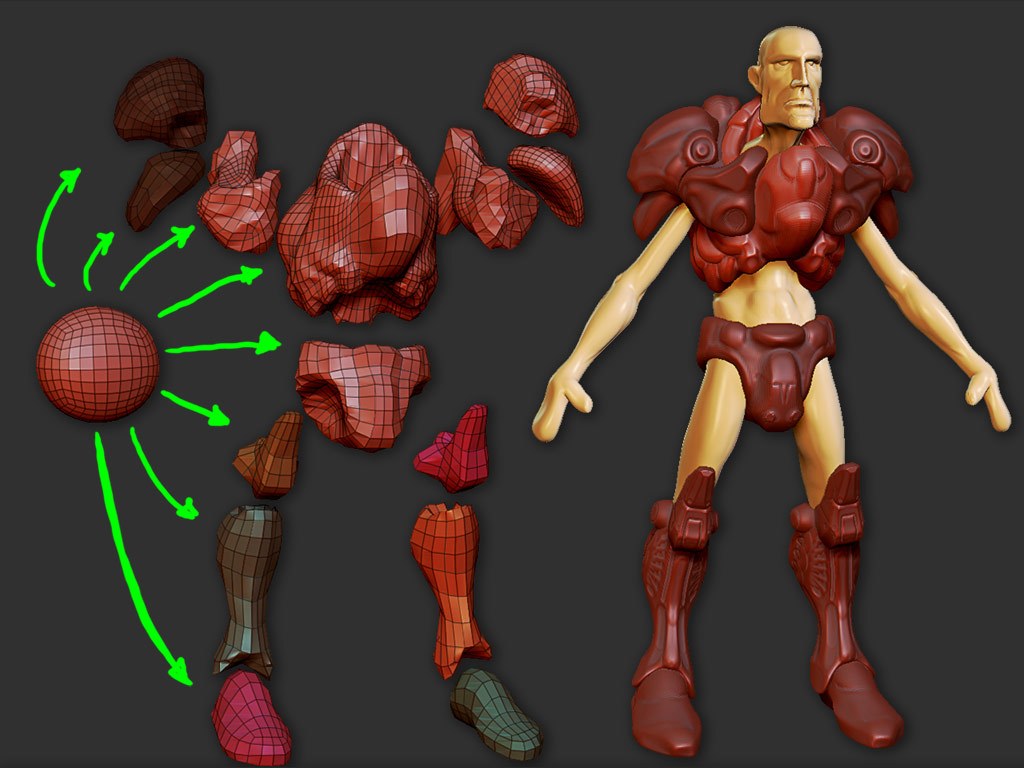
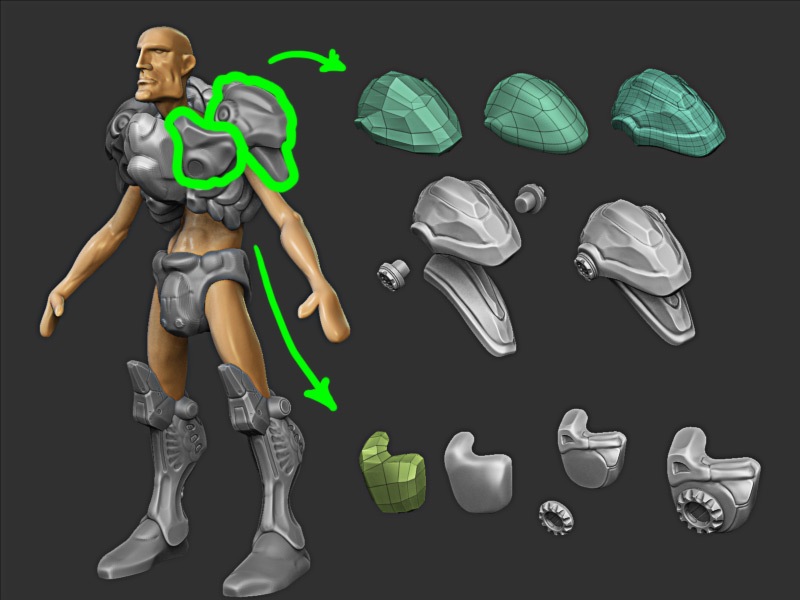
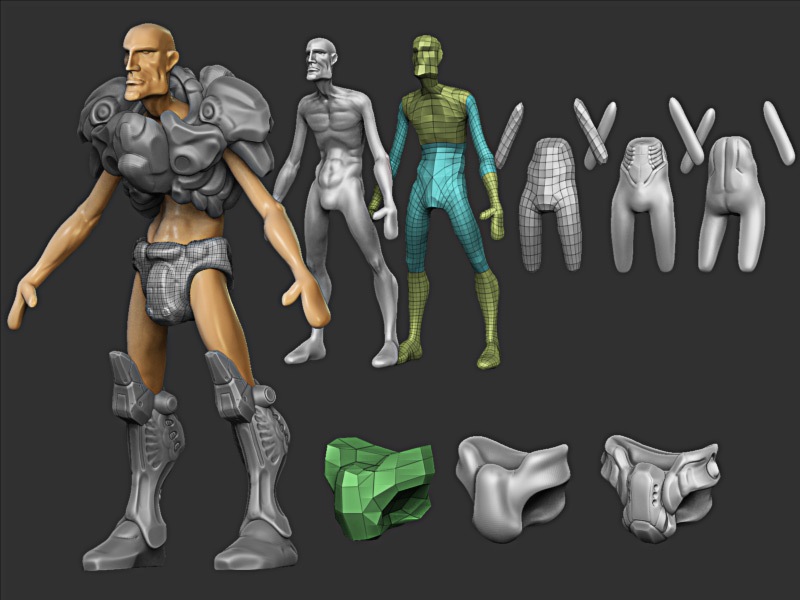
Ready the basis of the man I put on the various volumes of the armature (see figure below).
To make everything as fast as possible, since the structure was not important at this level, I generated each different item from a polySphere: shoulder, chest, torso, iron pants, knees, shins and feet.
Similarly to above I edited the first volume from rough and then added a few details of the test.
All the elements that have a symmetric dual (here and in the rest of the Making Of) where duplicated and reflected.
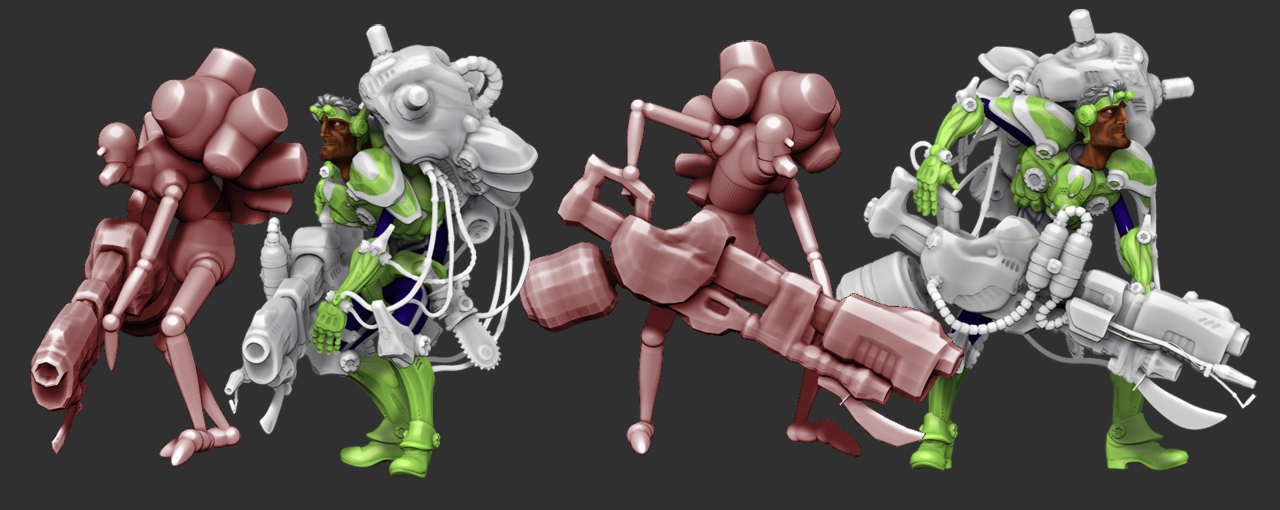
Before I begin to create all the individual items in detail I did a posing by adding the volumes of the backpack and weapon to see if I was going in the right direction.
The soul of John was not there yet, but the volumes were okay, so I started modeling more detailed …
Modeling Part 2
Defined the basis of the mercenary I began modeling the various elements one by one.
Before going into the details of individual items but I want to say a couple of things generally useful when working with such a large number of elements.
One thing is quite important to be able to keep under control the total number of polygons.
ZBrush allows you to work with a high number of polygons, but if you overdo it you risk ending up with a model too heavy and difficult to manage
I tried to keep more or less a density of polygons similar to the surfaces of each object, trying to get as much as possible to use the same number of subdivisions for everything.
More or less the limits I had imposed in terms of number of polygons are these:
– Small items (such as wheels and rods) ~ 20K/30K
– Intermediate elements (such elements chest, shins) ~ 100K/150K
– Large items (such as the torso) ~ 350K/500K
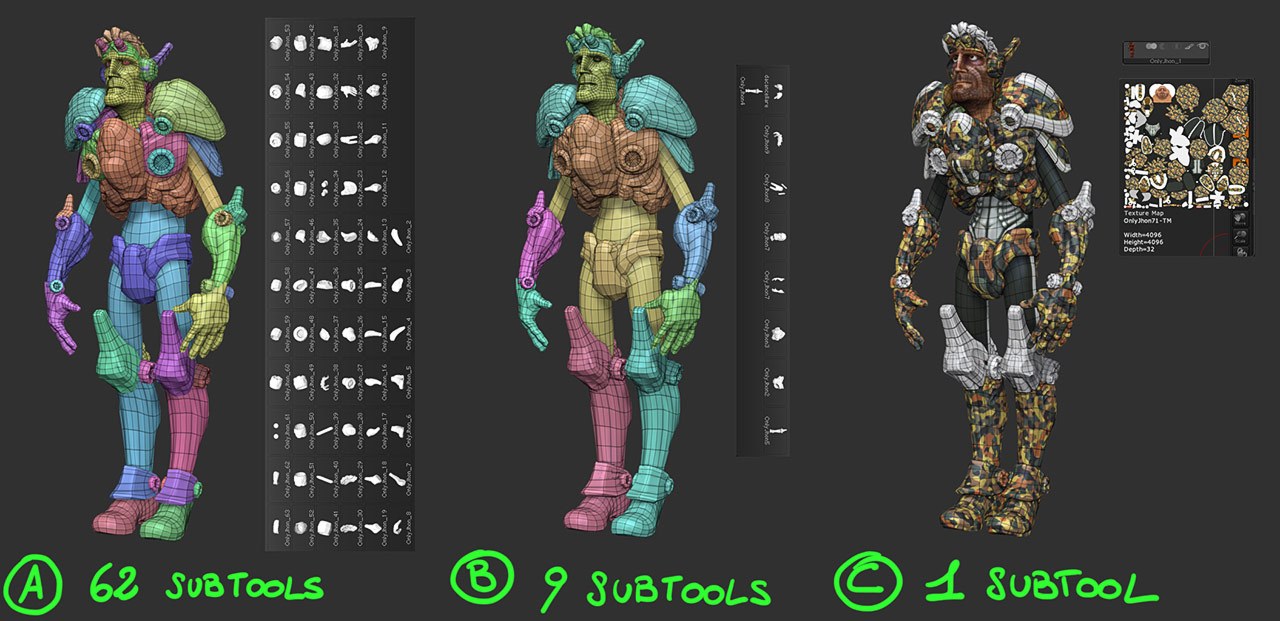
Another thing that I’ve given a lot of importance is to try to maintain the ability to “unite” and “separate” the various elements in sub-tools.
For example:
– To create a single item made me comfortable working on the most elementary structure (A)
– To pose the character suited me to move all the elements of a single block (eg knee and foot) (B)
– To use a single mesh for all it suited me to have all the elements merged into one subtool (C)
Throughout the work phase I overuse the selection of polygroup and fusion / separation of sub-tools.
In particular, the commands that I used most frequently:
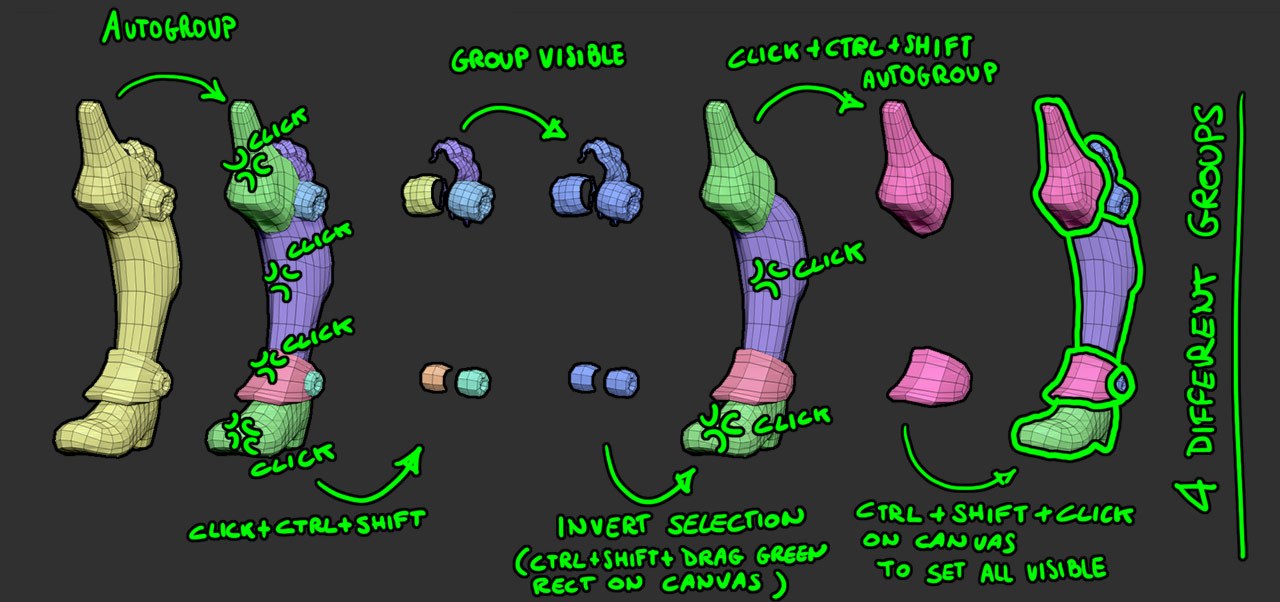
POLYGROUP:
– Autogroup: defines a single polygroup for each surface a self-contained
– GROUP VISIBLE: defines a single polygroup for all polygons visible
– CTRL+SHIFT+CLICK on polygroup: Select polygroup hiding everything else
Taking familiar with these commands a selection like the one below is a matter of seconds.
Once you have the desired “groups” you can perform MERGE/SPLIT operations between sub-tools:
– GROUP SPLIT: Divide the current subtool creating a single subtool per polygroup (preserving the levels of subdivision)
– HIDDEN SPLIT: Divide the current subtool subtool for creating a visible and an invisible part subtool for (preserving the levels of subdivision)
– MERGE DOWN: subtool selected blends with the next one (so that they are preserved levels of subdivision is necessary for both subtool are the highest level of subdivision)
– ALT + CLICK on subtool: Select subtool on which you clicked
The MERGE preserves the levels of division… that’s cool! …mhhh… but… ZBrush not always succeeds… and sometimes you found your subtool with only the highest level of subdivision without the possibility of reconstructing the lowest levels… and it is bad because the mesh becomes unmanageable.
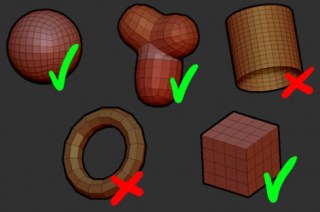
Trial and error I’ve noticed that if you combine the meshes are closed and no holes at all, then after the MERGE ZBrush can reconstruct levels almost always.
When using closed surfaces but with the holes (as for example the toroid) or open areas, then it is likely that ZBrush is not able to reconstruct levels.
For this reason, all the elements I used are “closed” and no holes … unnecessary polygons they can always be eliminated at the end of the work.
Modeling part 3
I will try to analyze the modeling of all the individual components of the whole model with risk of sounding even a little boring.
Each item was constructed individually before being posed, this in order to use, where necessary, the comfortable options about the symmetry.
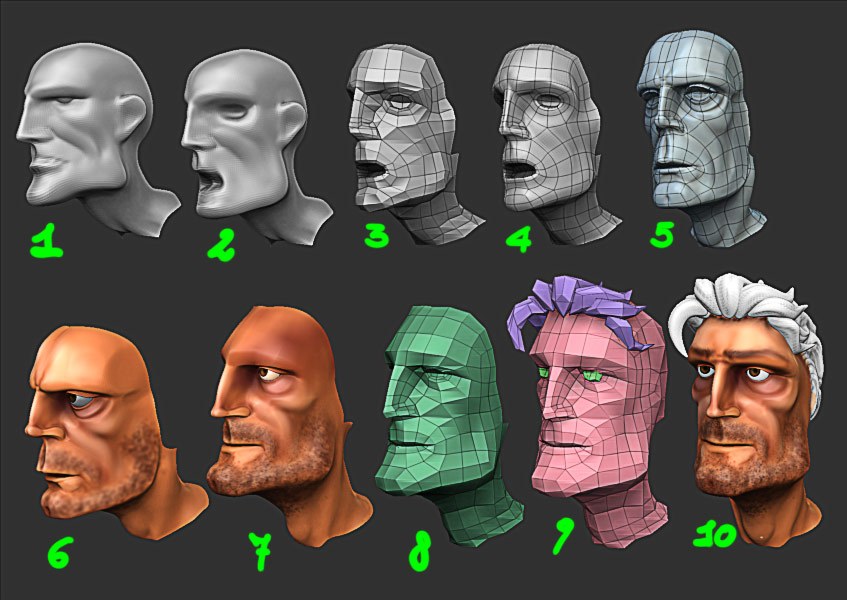
For the modeling of the head, I started from the draft model of the body:
– I have isolated and separated the head from the body to work better (1)
– I opened the mouth with sculpting tools (2)
– I rebuilt the structure of the base mesh before using the ZBrush Retopology tools and then adjusting the result in XSI (3)
– I subdivided the base mesh (4) detailing the face with the tools of ZBrush (5)
After I have colored the face with a fast poypaint I edited the volumes of the face working on the low level mesh: I used the masking and the brush “MOVE” with a large enough radius.
The appearance is literally changed (from 6 to 7).
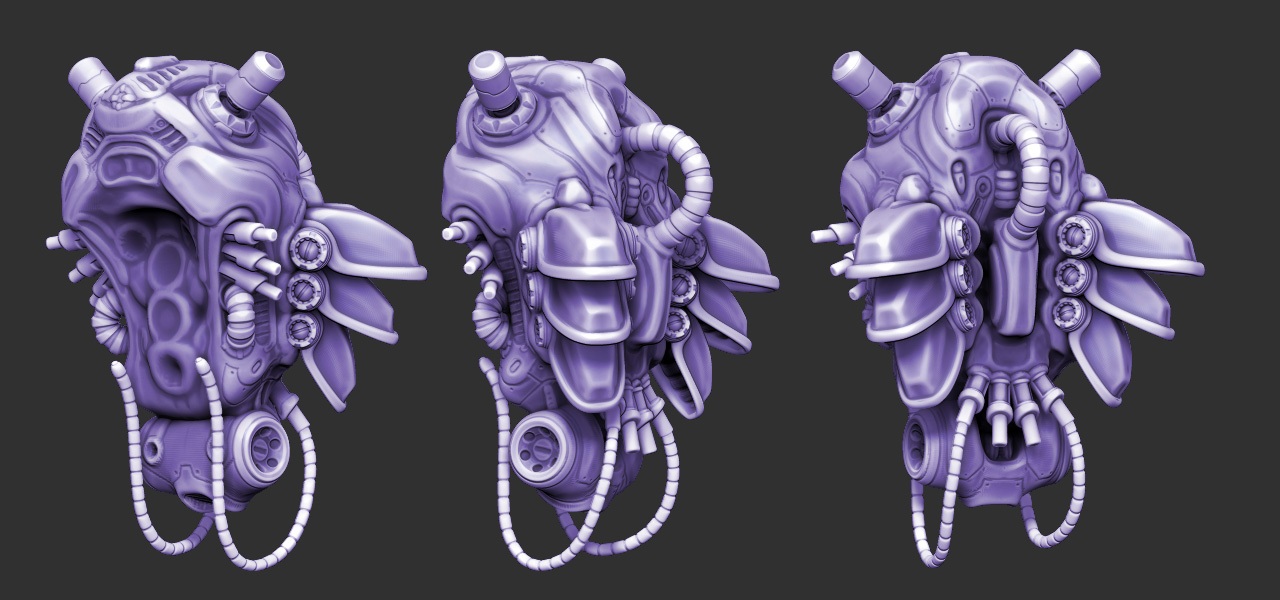
At this point I reexported the base mesh (8) in XSI in order to add the neck (9).
Imported back into zbrush I reprojected the details and added the tufts of hair (made from small chains of zSphere) and finished it all (10).
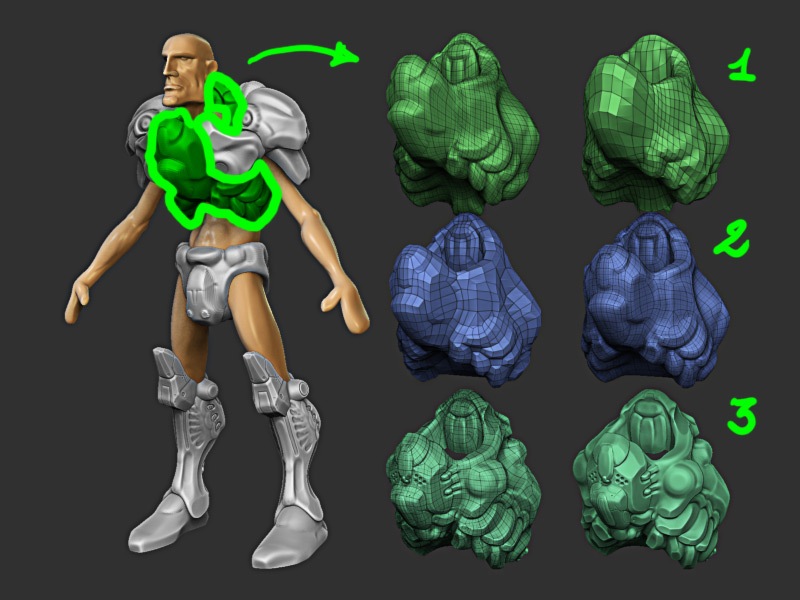
For the torso armor the procedure was again to make a retopology ( ZBrush + XSI ) of the basic structure then adds the detail in ZBrush.
Usually my approach is as follows:
I start using the brush “CLAY” to create some interesting volumes. Some strong stroke of this brush permit to get already quite smooth surfaces.
I finish using the polish brushes and the “Dam Standard” in order to markup all non defined borders and to put the final details.
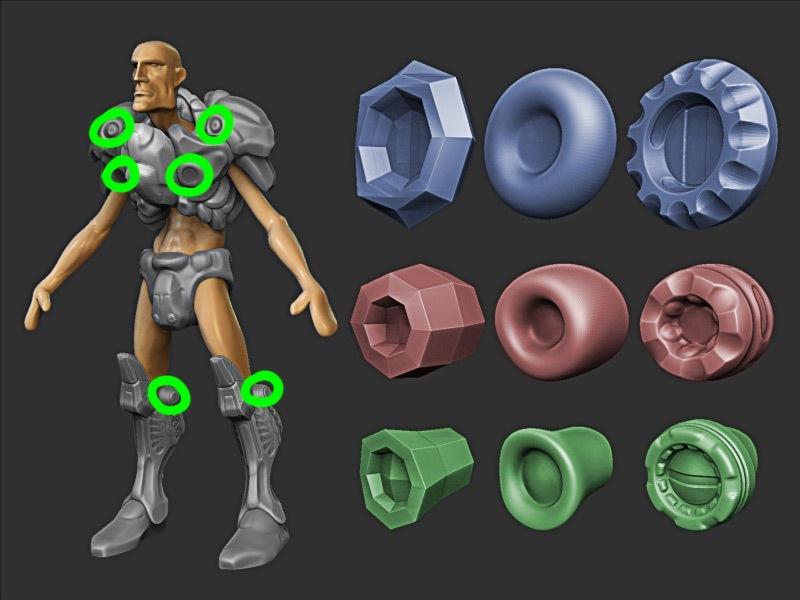
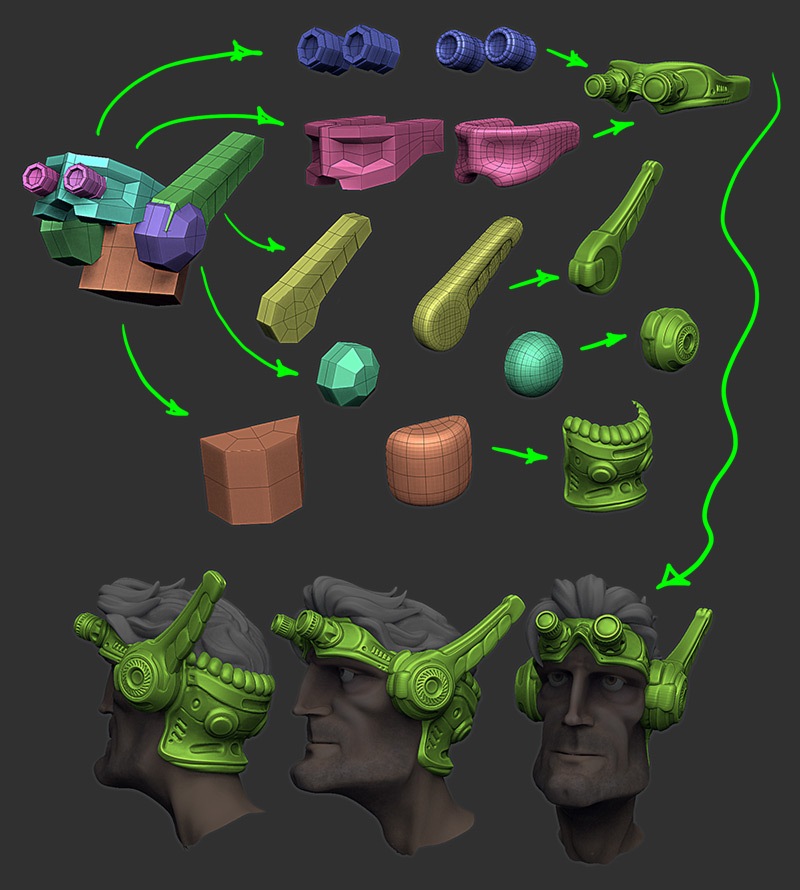
For cylindrical elements that are found in the joints (elbows / shoulders / knees), or are placed on the chest, I used a simple base mesh built from a cylinder in XSI.
Raised the level of detail I have enabled the radial symmetry.
Before, I used a number of repetitions of very high symmetry (64 and over), coupled with the brushes “CLAY” or “Dam Standard” to obtain the smoothed forms.
Then, I used a lower number of repetitions (08/03/12) to create the grooves with a brush “CLAY” or through the “Clip Brushes”.
For shoulder and chest the procedure was similar: base-mesh in XSI more sculpting in ZBrush.
Note that each shoulder is constituted by two elements generated from the same base-mesh and then deformed in ZBrush.
With the torso, shoulder and chest sculpt we have here the whole of the upper part of the armour.
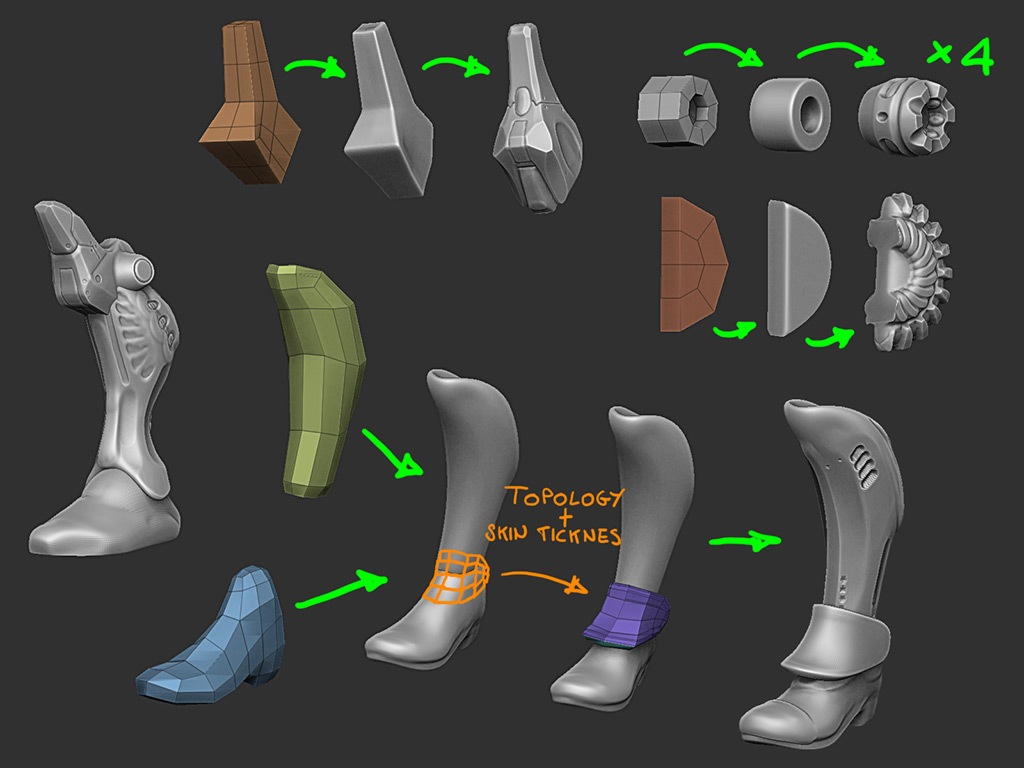
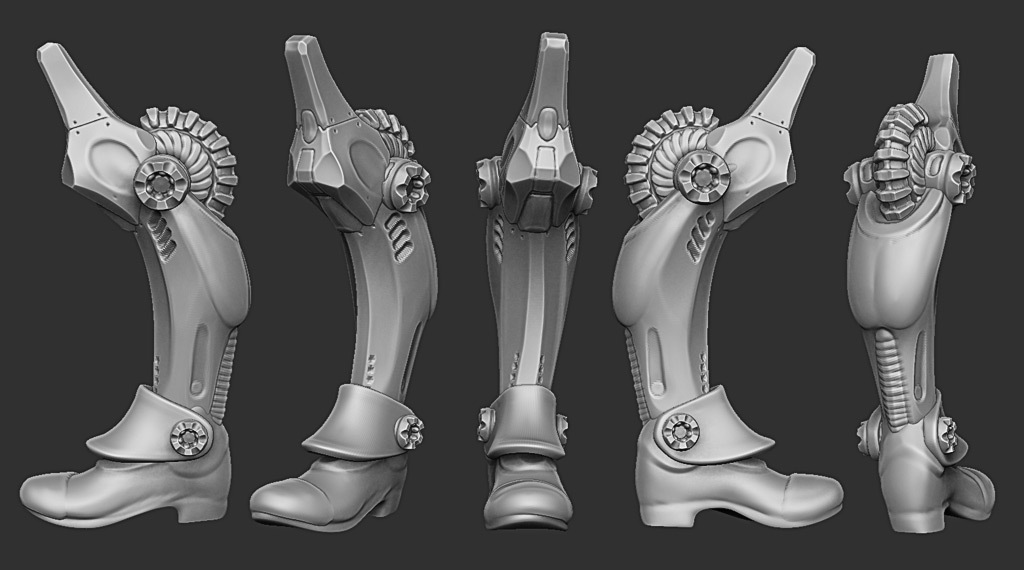
For the leggings, similarly, from my base I start using the zBrush retopology, refine the base mesh in XSI, and then I add details in ZBrush.
Only a few notes:
The brushes used are those of above.
For the “half” wheel under the knee I used, as for the other elements, circular symmetry.
As indicated in the figure, the part that covers the fette was created using the “tickness” of the retopology tool of ZBrush.
The elements of the above figure, together, make up the boot.
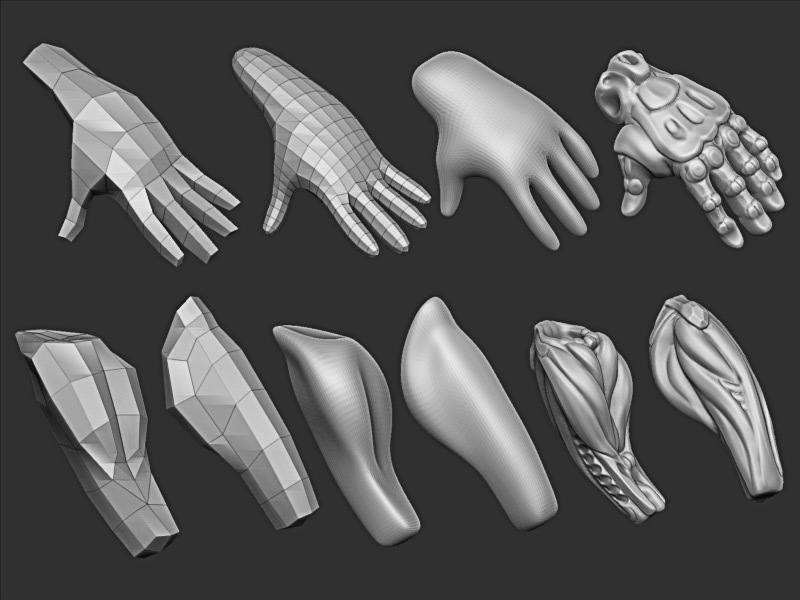
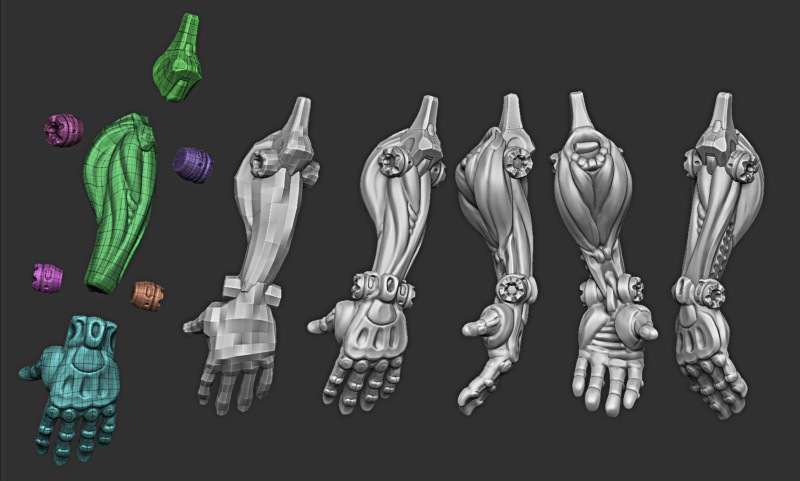
In the same way I go forwared for the arm: based mesh with zBrush retopo and XSI plus final sculpting in ZBrush.
And putting together here is the result (Fig. 19). Note that some items are recycled (eg the elbow is the knee shrunk).
All the cylindrical elements (here, but generally everywhere) are never perfectly aligned in the same axis, but rather a little inclined to each other.
I proceeded in the same manner to suit and for the iron pant…
…and finally with the helmet.
Modeling Part 4
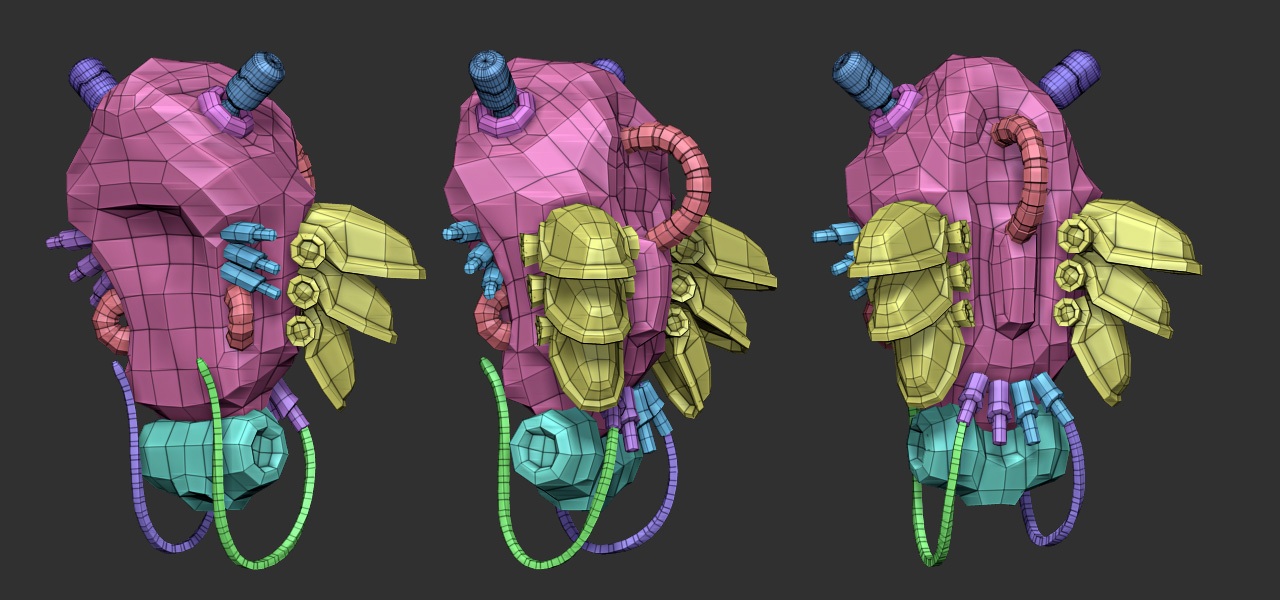
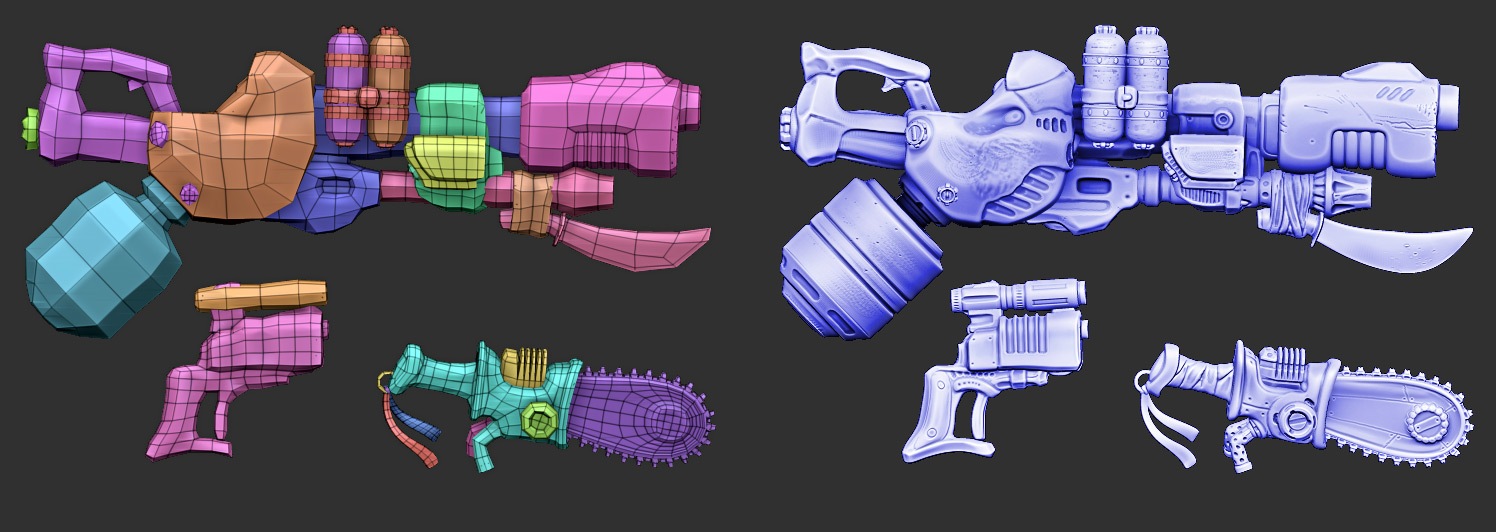
I operated in a manner similar to the backpack and the weapons. I will report here only the low-poly mesh and the resulting zBrush sculpt.
A separate discussion deserve it instead of the tubes and the chain saw.
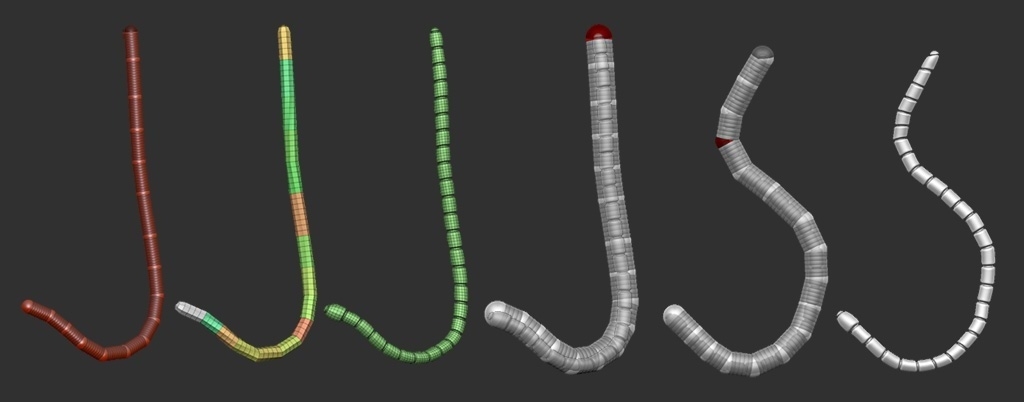
Let us first consider the tubes:
The tubes were molded from the chains of zSfere.
Obtained the chain of balls I made ??the skin and subsequently transformed into Polymesh exported.
I have taken care not to remove my original range of zSfere … This will be useful later when you’ll lay the pipes.
In XSI where I changed the structure, for example, to have the effect “shower hose” adding channels.
Then I reimported all in ZBrush, where I divided and added in some cases a few more details.
(See the three images to the left in the figure)
I performed the export/import in XSI and using the plugin found at this LINK and it implements some of the features of Goz for Softimage.
To pose the pipe I used the following procedure (see three images to the right of the figure):
– I get the reworked tube, I’ve duplicated it and removed the higher levels of subdivision.
– I took the original zphere chain and I have selected as BindMesh the “Low Poly” pipe
– I adapted the zSphere envelope increasing slightly the radius of the spheres in a manner that the tube was fully contained within the volume of the chain of zSphfere.
– I clicked on “bind mesh” and posed the low level tube
– I made first the “skins” and after the polymesh (“make Polymesh”) in order to have the posed base mesh.
– I Exported the posed base mesh.
– At this point, selecting the mesh of the original pipe at the lowest level of subdivision and importing “above” the posed base-mesh tube I get the Hi tube posed.
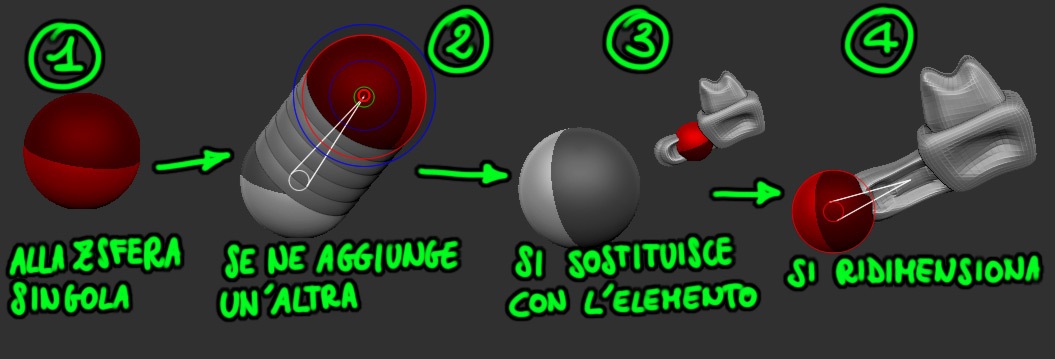
For teeth of the saw I used a very convenient feature of the zBrush zSpheres.
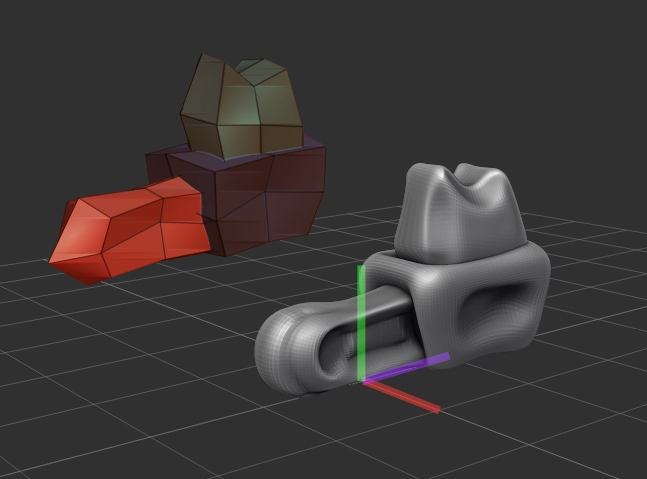
I have created the basic structure for the tooth of the chain, trying to remain on a very low number of polygons because such an element will then be duplicated many times.
Created the tooth is necessary to ensure that the axis position is correct, we keep in mind that the elements will be placed along the X axis (see figure).
Once done we begin to create a chain with two or three spheres to which replace the basic element.
Note: To create new spheres of the same size we have to hold down “Ctrl” while we add new items.
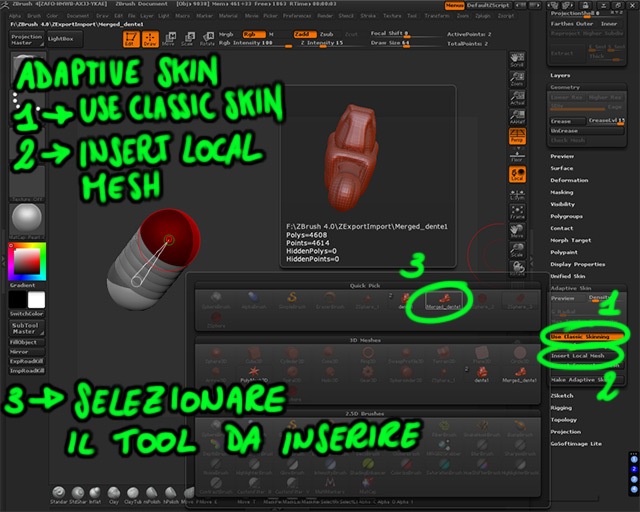
For the replacement of the basic element is required that:
– We have to ensure that a chain sphere is selected
– We have to select from the menu “Tools” -> “Adaptive Skin” -> “Use Classic Skinning”
– We have to select “Insert Local Mesh” and select the base element.
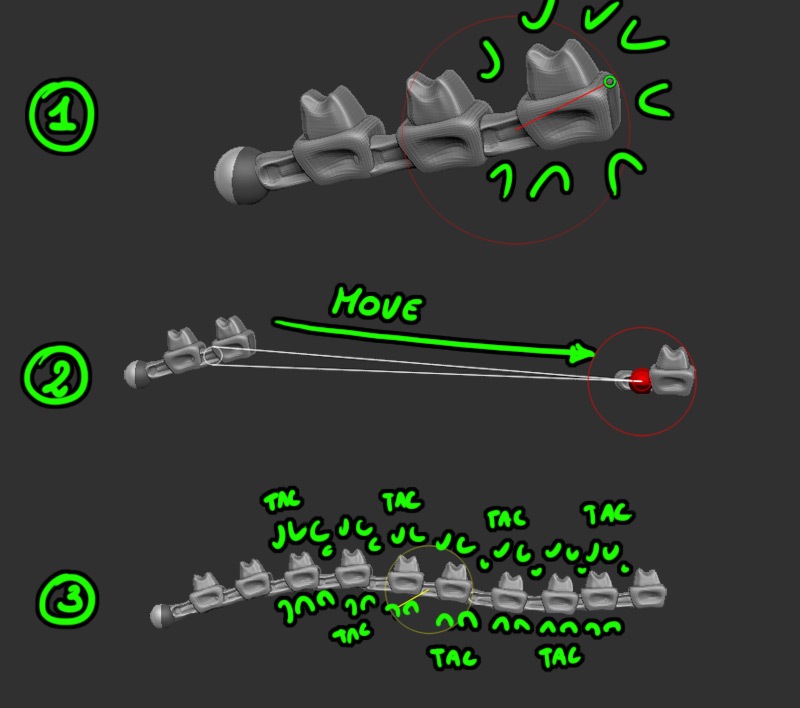
Done the operation for an item, just add more balls to get other basic elements.
In order to go a bit more faster you can move an item at a certain distance and “add” the other elements between this element and the previous (see in figure).
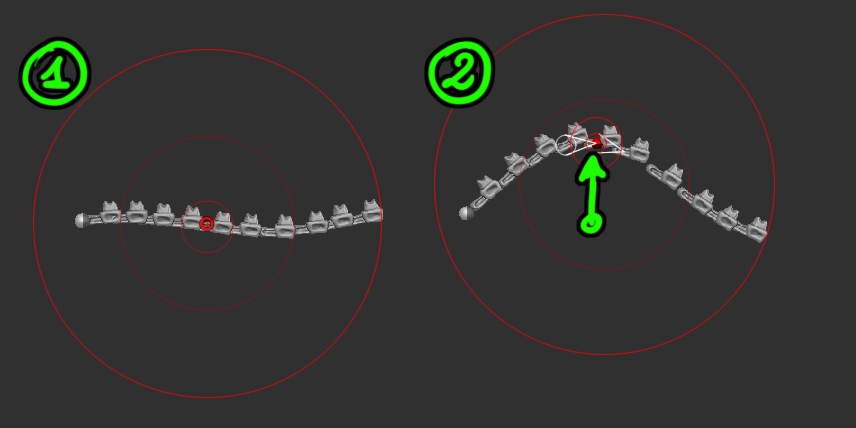
Once a chain of elements is done it is easy to position it with the Move/Rotate/Scale tools remembering that, using a large radius of the selection, we can operate on the same time on multiple items.
The modeling is “almost” finished … we lacks only the pose of the model and to adapt some elements (ex. hands gripping the handle of the weapon, etc..), but before we start these operations we care for the UV mapping.
UV mapping
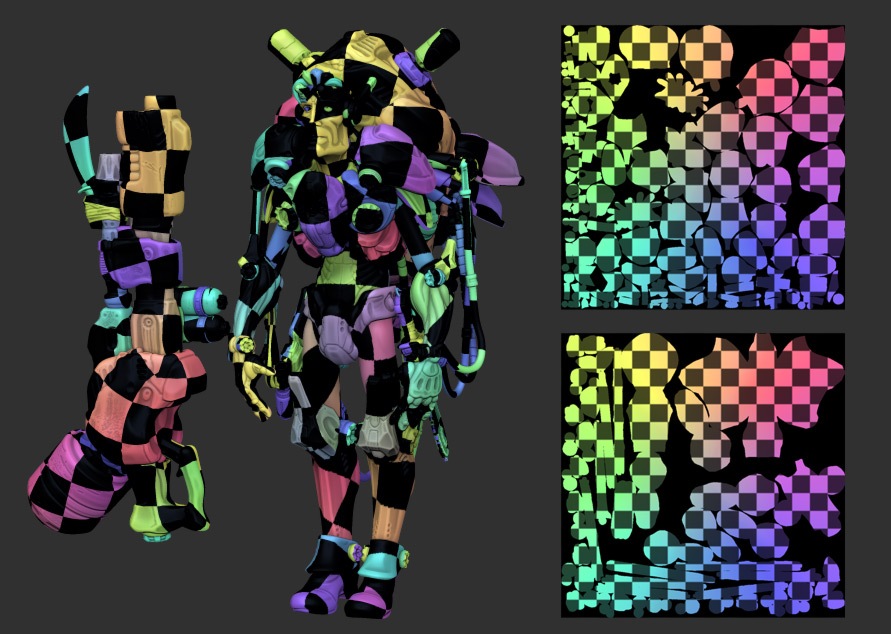
My intention was to have a unique texture that would cover all the individual elements, which are still separated into many distinct Subtool.
In order to apply a single texture I had to “melt” together all the individual elements (Fig. 31)
Before making such a merge, however, I worked to create a UV mapping for each elementary component: this allowed me to avoid having to define the “cuts” (or “seam”) on the full model (which would be result in a much more complex operation).
Thanks to the simplicity of the forms I was able to create a mapping for the basic elements very quickly using Roadkill (freeware tool for creating UV maps).
For each element I followed this procedure:
1 – You select the base element (subtool)
2 – choose the lowest level of subdivision
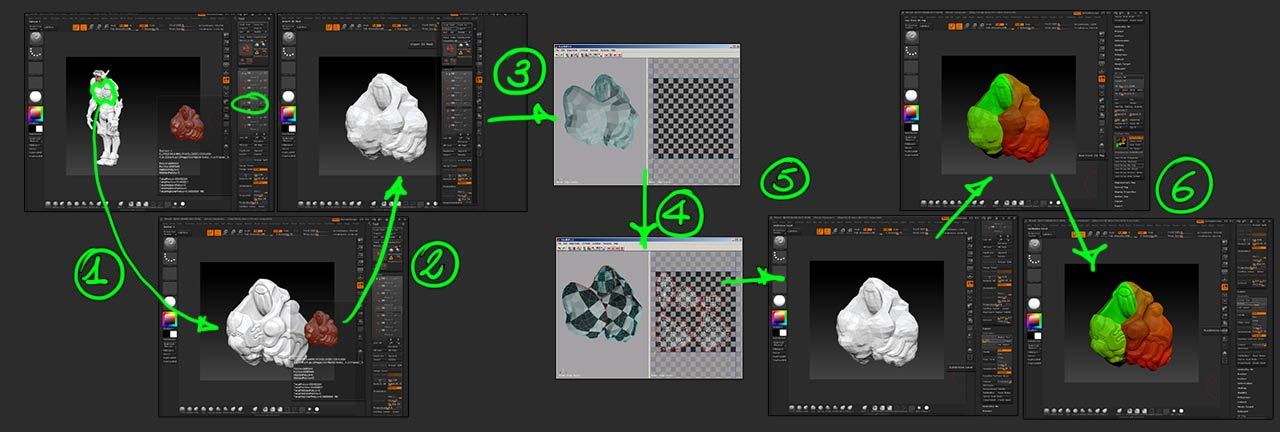
3 – make “polymesh” (this in order to avoid a crash on RoadKill that can’t correctly read meshes with color information exported by zBrush) and reconstruct subdiv to the lowest possible level.
3 – I export the resulting “polymesh” in OBJ format (without leaving ZBrush)
4 – I open it in Roadkill, select the Cut/Seam, I generate the mapping, I save the obj
5 – in ZBrush I reimport the obj mantaining selected the lowest level of subdivision of the original tool.
6 – This allows the mapping applied without losing fine details of the highest levels.
NOTE: Due to the repetitiveness of the operations to make faster, I recorded 2 macros:
– A subtool to export a generated polymesh reconduced to the lowest level of subdivision in a fixed location (eg C:\onWorkSubtool.obj)
– One for re-import the subtool from a fixed location after it reworked with Roadkill
Once obtained mappings UW is time to melt all the elements.
Before combining all the elements, I paid attention to two important features:
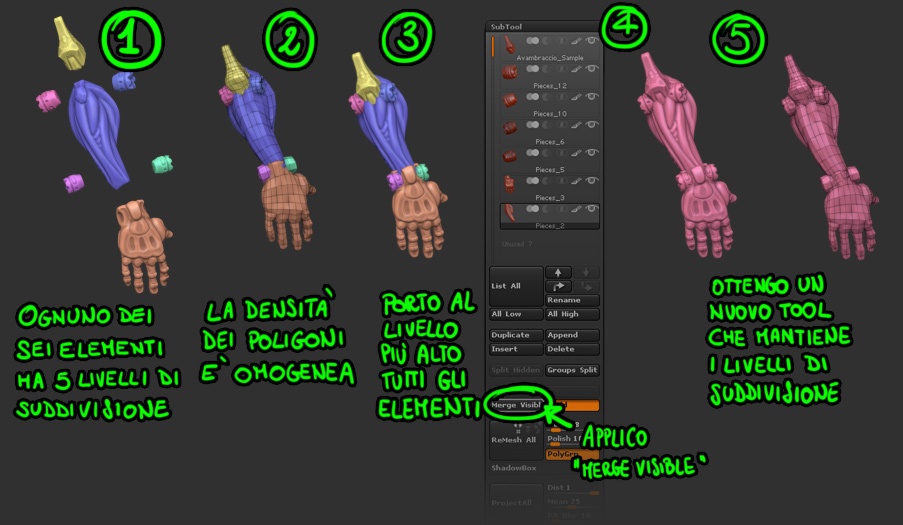
1 – Before merging two (or more) items I have to check that both elements have the same number of levels of subdivision.
2 – Before merge two (or more) elements I have to check that the density of elementary polygons was comparable (easily visible to the lowest level of subdivision).
Checked these two things
3 – set the highest level of subdivision (which must be the same) for all elements
4 – select the “Tools” -> “Sub Tool” -> “Merge Visible” (please take care to have the UV button checked)
5 – The result is a new tool that consists of a single subtool that preserves all levels of subdivision and the UV maps of the various subtool.
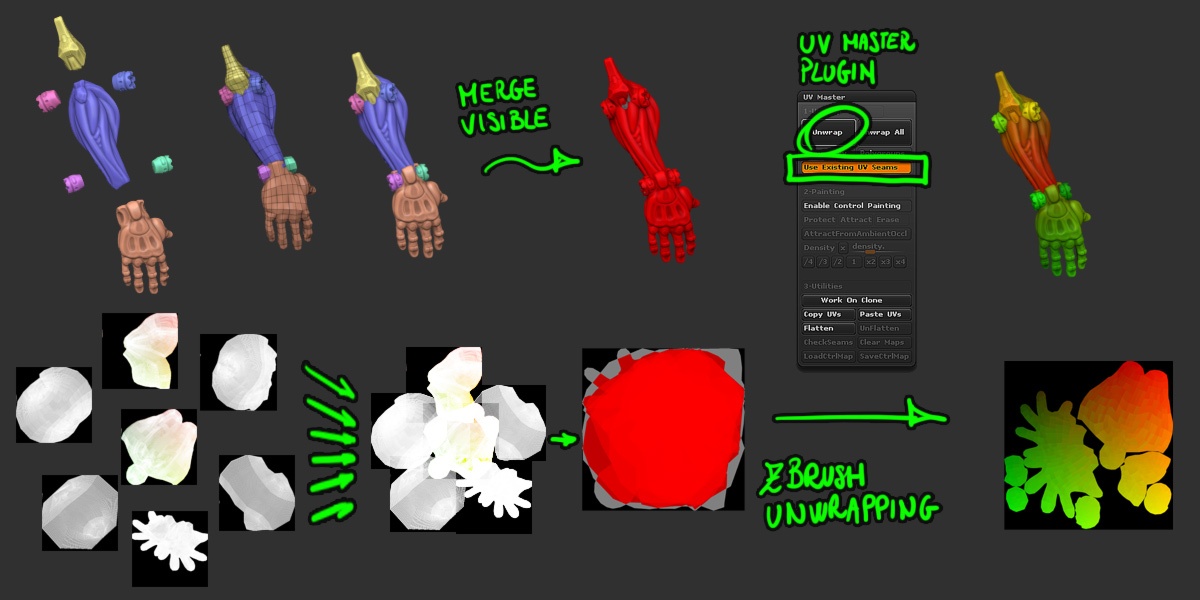
Of course, immediately after the merger, the mappings of the various elements are superimposed (see figure), but just open the UV Master (making sure to tick the option to keep the “seam”) to obtain a mapping that preserves the cuts described above with Roadkill (Fig. 34).
Repeating these steps on all the elements and we reach the end result… now we can begin to sketch out the texture.
In my case I created two Tool, one for the mercenary with suit and armour, and the other for weapons, backpack and other things.
Pose and Final Modeling
Another small step “backwards” in the pipeline: a return to the modeling stage to pose the model and finish some small details.
In order to find the correct pose in the best way I’ve used the mannequin by Rian Kingsley (one of the projects bundled with zBrush4) ehere I superimposed the proportion of my model.
Once ready, I started doing some tests in order to put him in pose.
Satisfied with the test result I moved the various elements of a block at a time (through the use of isolating polygroup and masks).
The suit was one of the few elements for which a rigid translation was not quite right: I have applied in this case the deformations using the “transpose” and found help with the use of masks.
For the tubes I used the method shown above.
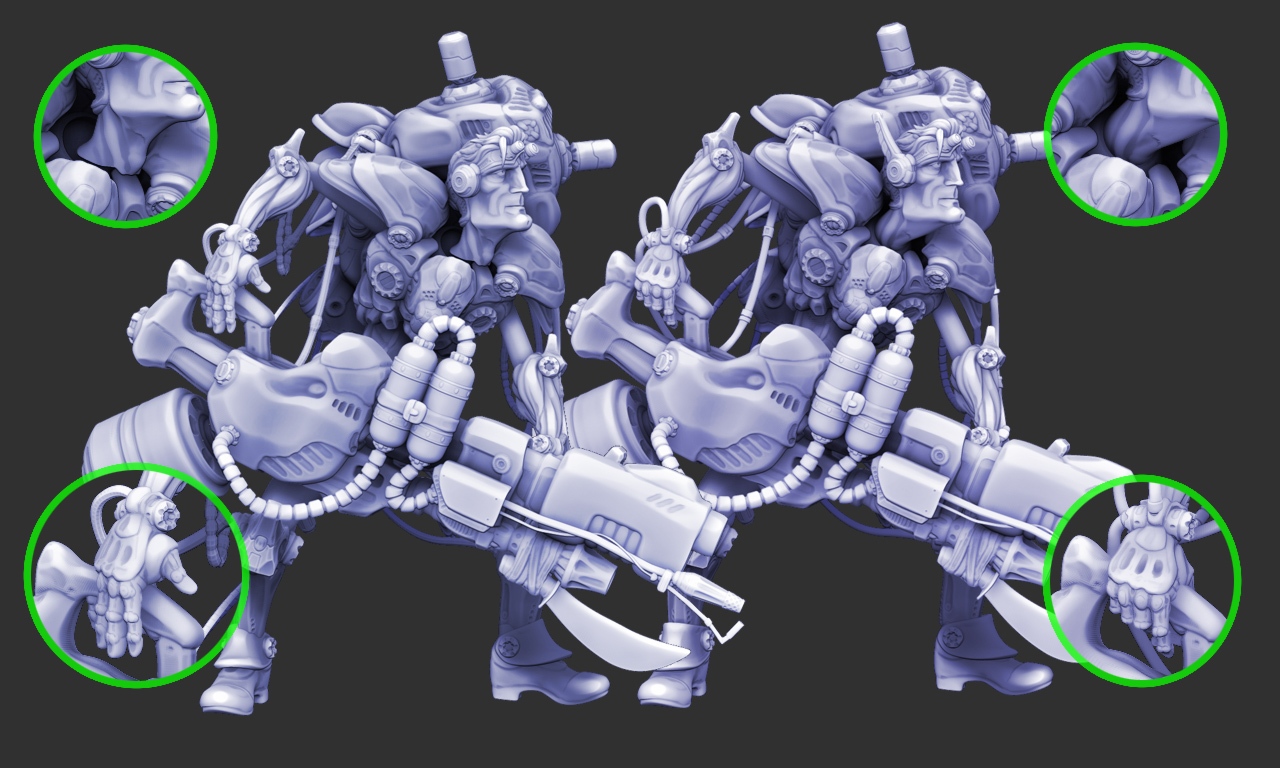
At this point I went on to finish his hands to fit the handle of the weapon (see figure), and facial expression to create the “Angry Popeye” look
After completing the installation I added to the base a nice cropped tentacle.
At this point the steps of sculpt and modeling can declare definitively concluded.
Texturing
For the texturing I used both ZBrush and Photoshop.
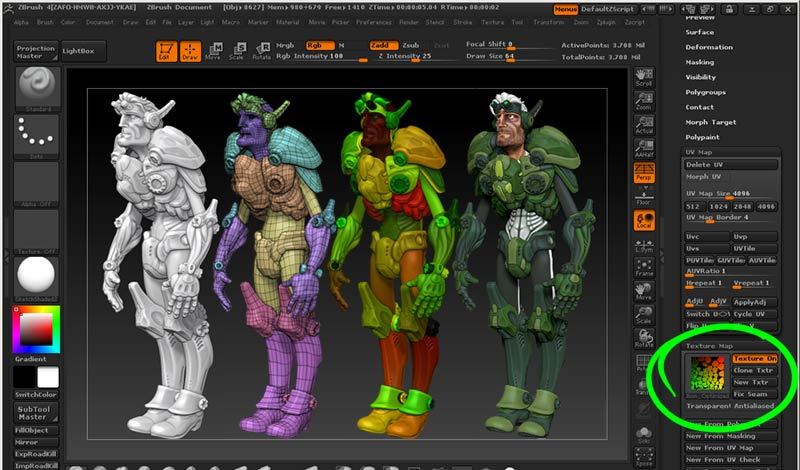
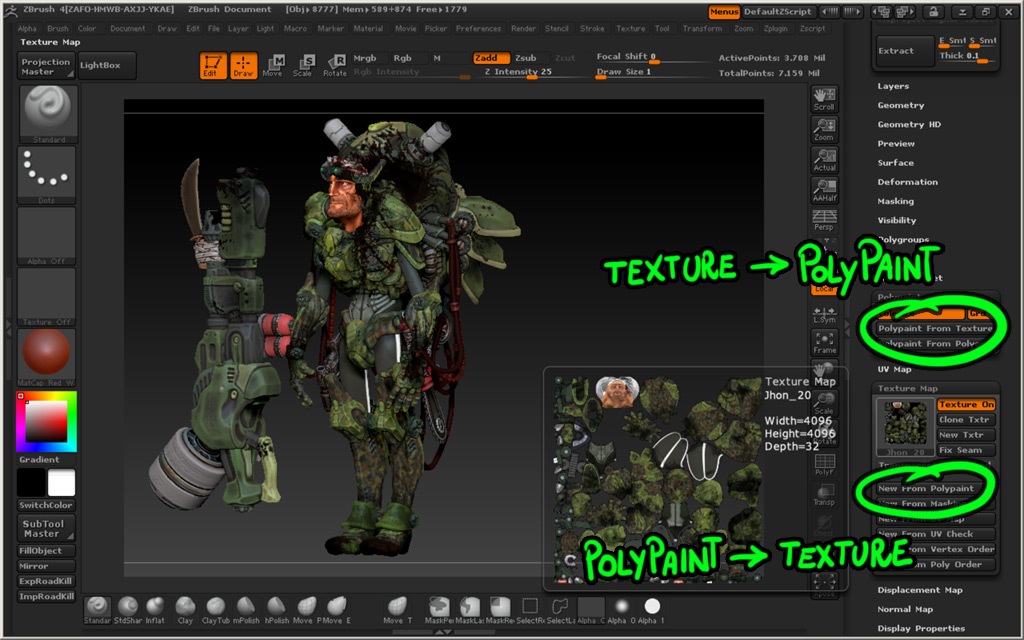
During the process I have often passed from polypaint to texture [Tool-> Texture Map-> New From Polypaint] and viceversa [Tools-> Polypaint-> Texture From Polypaint] (Fig. 39).
ZBrush is more convenient to work directly on the model as if it were a miniature (through the polypaint). Instead Photoshop it is useful for blending between levels and to adjust color.
We must not exaggerate the number of transitions Texture / Polypaint as a minimal loss of quality is physiological in this operation.
The fact that we posed the model after the UV mapping allows to work on texture independently on the posed model or in the not-posed model (T-Pose).
In my case I worked mainly on model not posed, in order to fully exploit the symmetry.
I’am passed to work on the posed model only in the final stage to add the dirt details (as dust and cracks).
The steps I followed are:
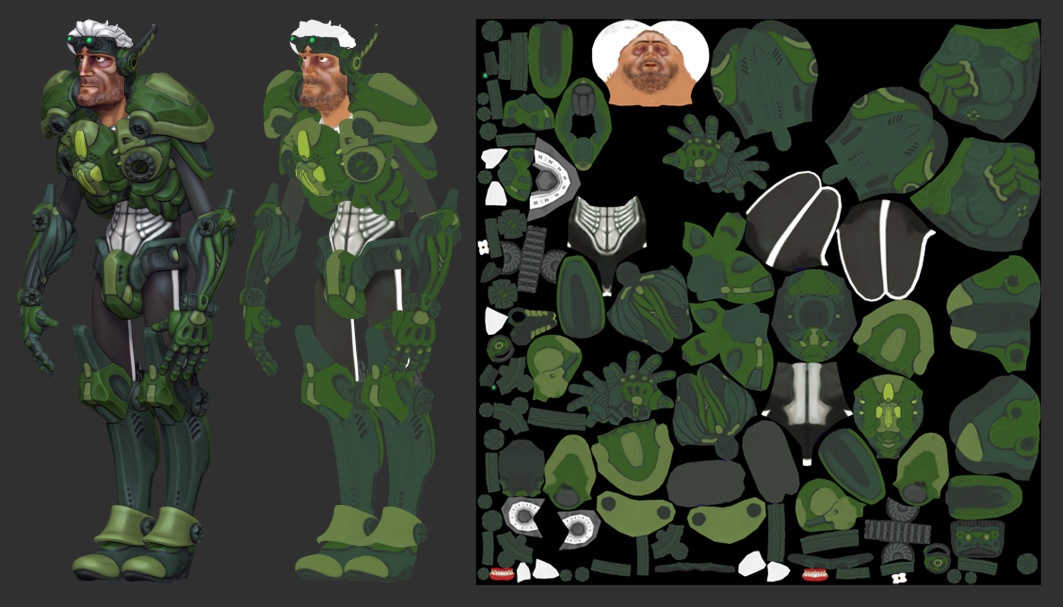
1 – Definition of basic colors for each element:
I tried a shade that I liked and gave a uniform color for each element, without caring, for now, of shadows and details.
I gave the color on zBrush directly on the model using the standard brush with RGB mode enabled (and Z-mode disabled) using the Alpha 14 (the circle with the edge slightly beveled).
From polypaint I got the texture.
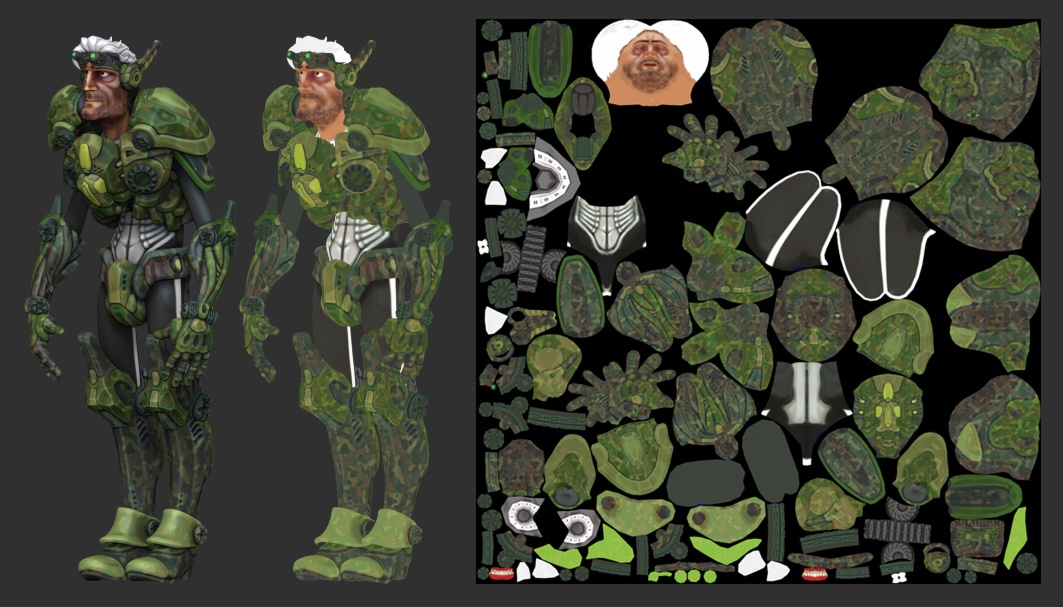
2 – Exported the texture in Photoshop, I created masks for areas of the armor. To these, on a separate layer, I applied a “camouflage” texture.
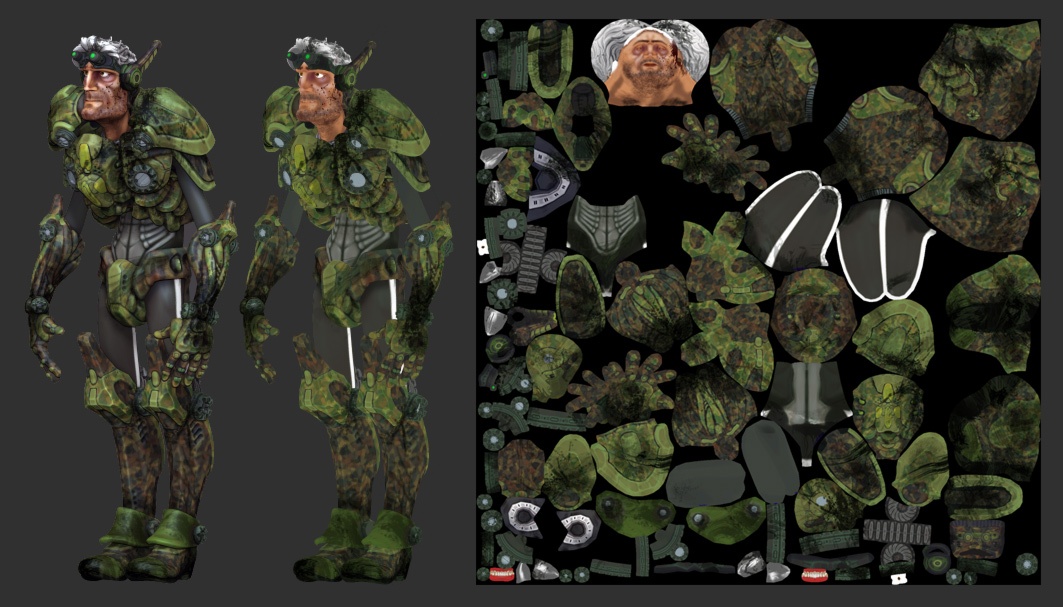
3 – Returning in ZBrush I detailed the areas of shadow and light working element by element.
The fact of working for each element is dictated solely by the fact that the shadows and highlights using different tones depending on the base color: generally I try to avoid where possible the pure white and pure black. For example, for the shadows of a yellow or pink flesh I use a shade of brown, while the green camouflage might be better to tack on a dark green dark.
Even a few brushes (such as “CLAY”) where used to colorize (only RGB mode), the color deposited unevenly, preferring areas of cavities or the ends emerging and making it much easier to bring out the details of sculpting.
At this stage of detail zbrush meets with the ability to select for cavity (“cavity masking”) or the gray areas of the model (“AO maskig”) … with a couple of selections, followed by the “fill” is already possible to obtain excellent results.
We can use in Photoshop the “displace” and “cavity” maps created with ZBrush as layers for the “diffuse” map.
4 – Finally, using the model posed in ZBrush, with a nice Alpha, I added a little here and there some dirt in a pseudo random mess.
Final Compositing
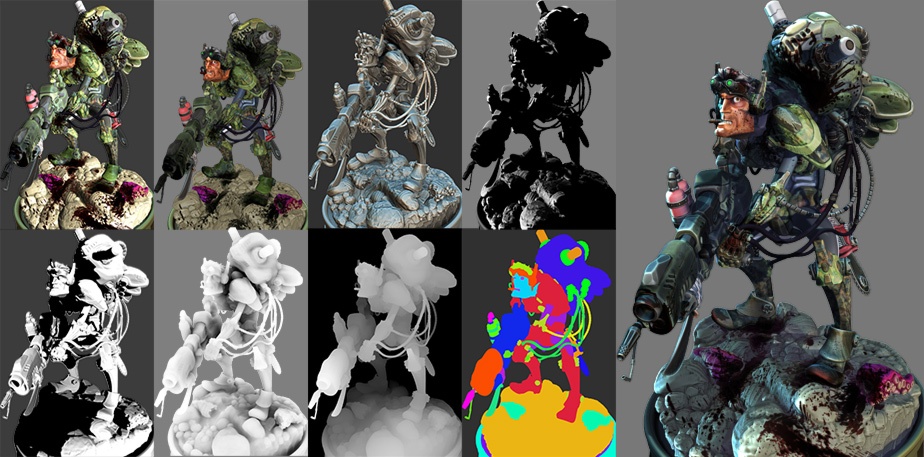
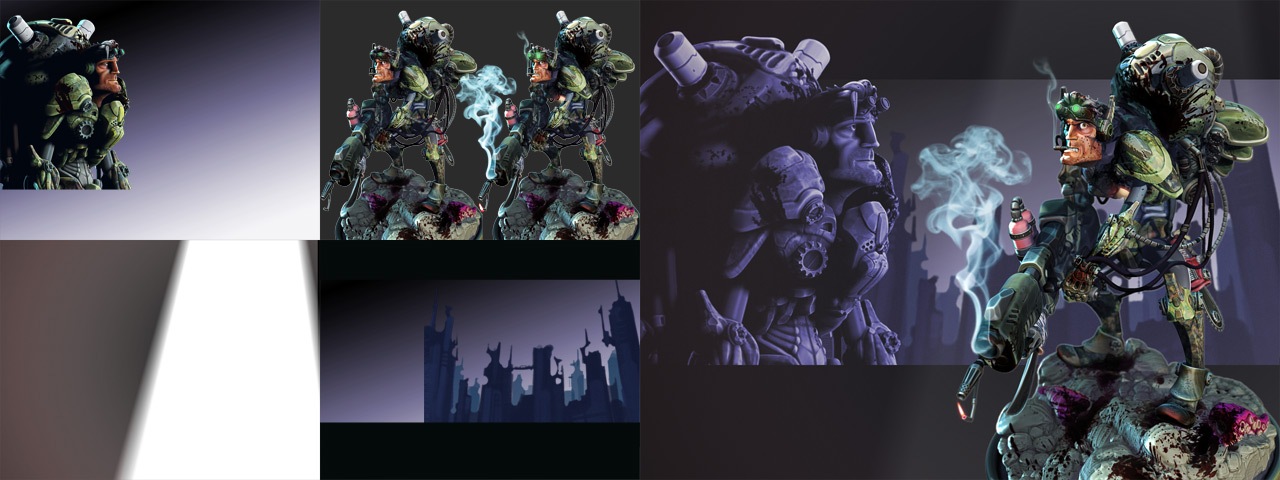
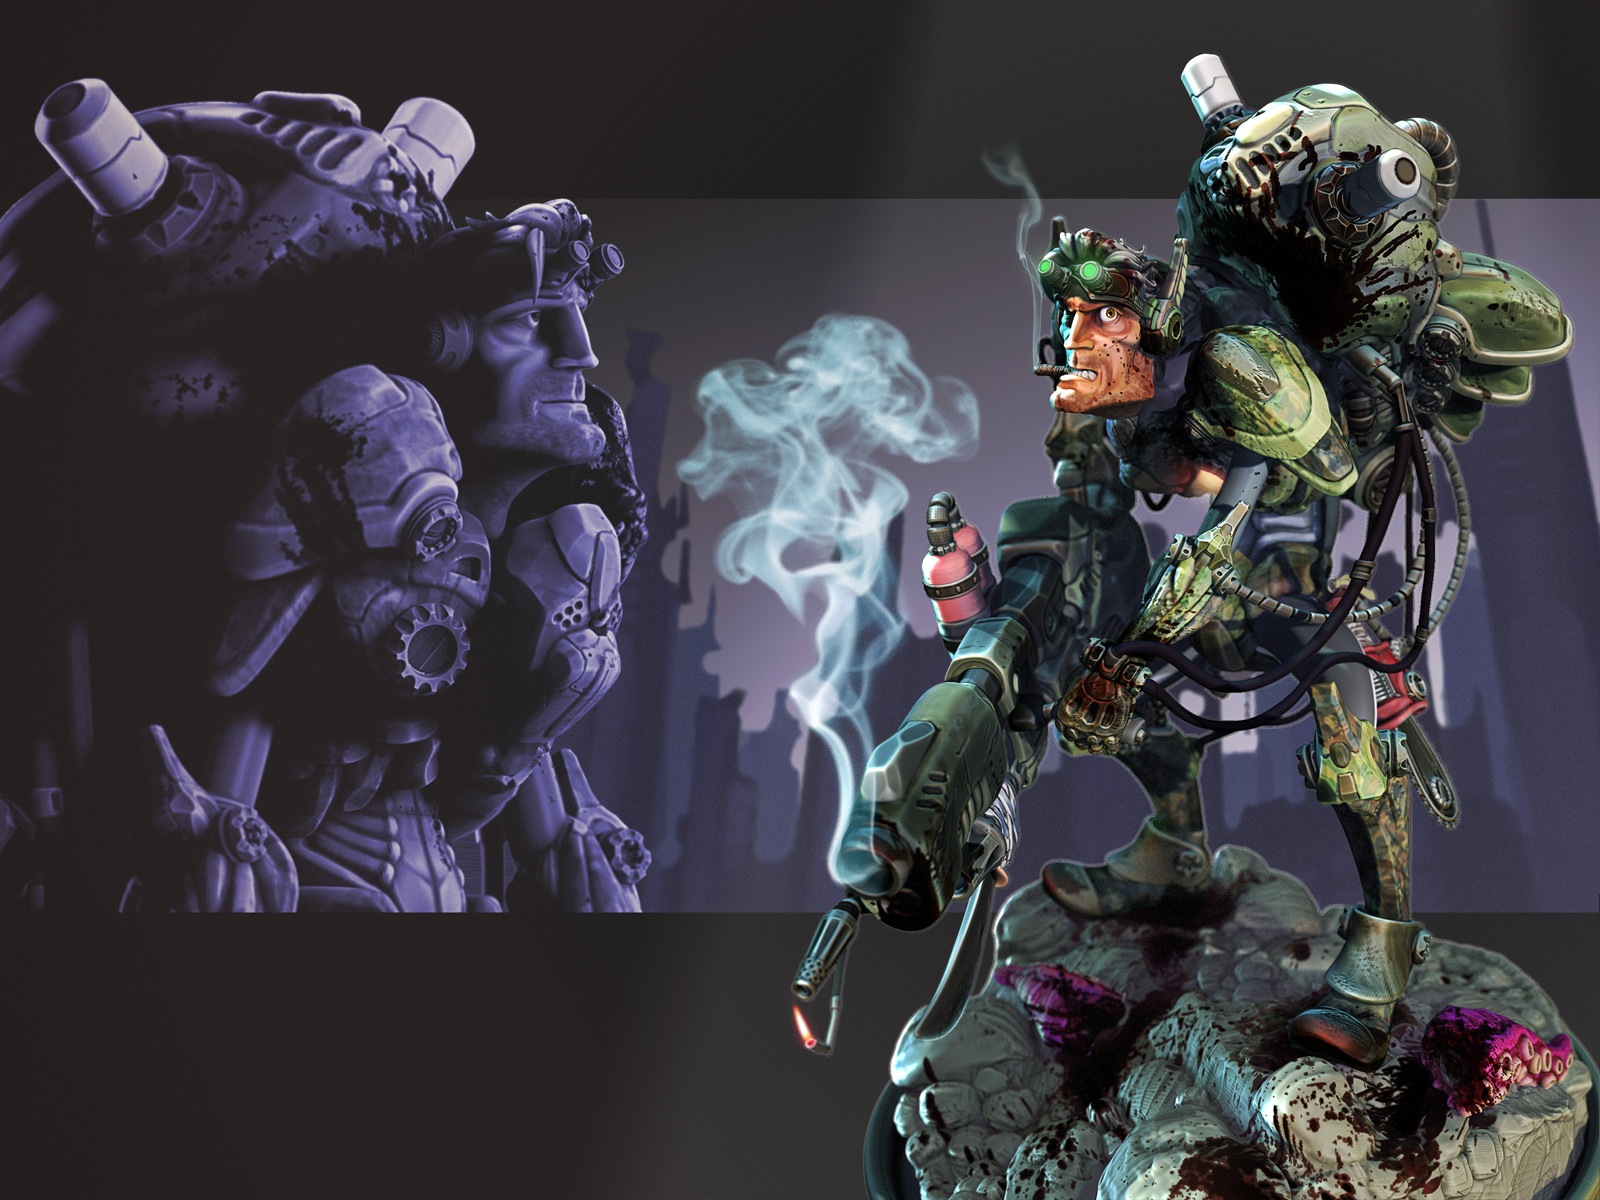
For the final composition I made various render of the model in ZBrush and then I reworked these renders in Photoshop.
I just want to insert here part of the layer used for rendering the character and composition presented in the contest.
Layer used to render the character:
Layer used for the composition:
Final Image:
The new version of ZBrush makes this very simple approach as the “Best Render Preview” already exists the possibility to create different levels corresponding to “Color and shader”, “Shadow”, “Ambient Occlusion”, “depth”.
– The Concept
– Modeling part 1
– Modeling part 2
– Modeling part 3
– Modeling part 4
– UV mapping
– Pose and Final Modeling
– Texturing
– Final Compositing
if you have founded this Making Of interesting, please leave a comment: this will be for me a great reward






I like the valuable information you provide on your articles.
I will bookmark your blog and test again here regularly.
I am quite sure I’ll be informed many new stuff proper right here!
Good luck for the next!
obviously like your web site however you need to check the spelling on several of your posts.
Several of them are rife with spelling problems and
I in finding it very troublesome to inform the truth nevertheless I will definitely
come again again.
I’m curious to fibd out what blog pplatform you’re working with?
I’m having some small security problems with my latest site and
I’d like to find something more risk-free. Do you have any solutions?
I’d like to thank you for the efforts you’ve put in writing this site.I really
hope to see the same high-grade content from youu inn thhe future as well.
In truth, your creative writing abilities has motivated me to gett my own website now
;)
Oh, sorry Augusto, this is DRAGON from ZBrushCentral. You knew I had to come here and give you support.
Everything I see coming from you is TOP NOTCH! And this tute, is no exception. I was exhausted reading it… and I had not even gotten to the polypaint/texturing section! Thank you very much for all this professional advise.
Really great tutorial! 2 Thumbs up!
Thanks so much for this making of – it’s an incredible piece and you told a lot of tricks I might be able to use on my future models.
However – will stop by more often and see what you are cooking up!
Great artwork!
VISEone